
You’ve got yourself a Raspberry Pi (RPi) single board computer, you’ve installed an operating system, but what now? What can you actually do with this thing? Well, what do you want to do? What can it do?
Here I will breakdown my top favorite RPi projects. And if you want to attempt any of these yourself, I’m going to provide all the links and resources you’ll need to make your life easier (Because who wants to work hard right?). Alright lazy people, here we go.
Pi-hole
Pi-hole is a network-wide ad blocker and DNS server, and it’s absolutely one of the easiest Raspberry Pi projects on this list. You can have a Pi-hole up and running in less than 30 minutes, and it’s going to be filtering ads out of your internet activity in no time. I especially love it for my IoT network where devices like my fire TV stick, Alexa etc. are constantly trying to send data back to their servers. Thank you, Pi-hole.
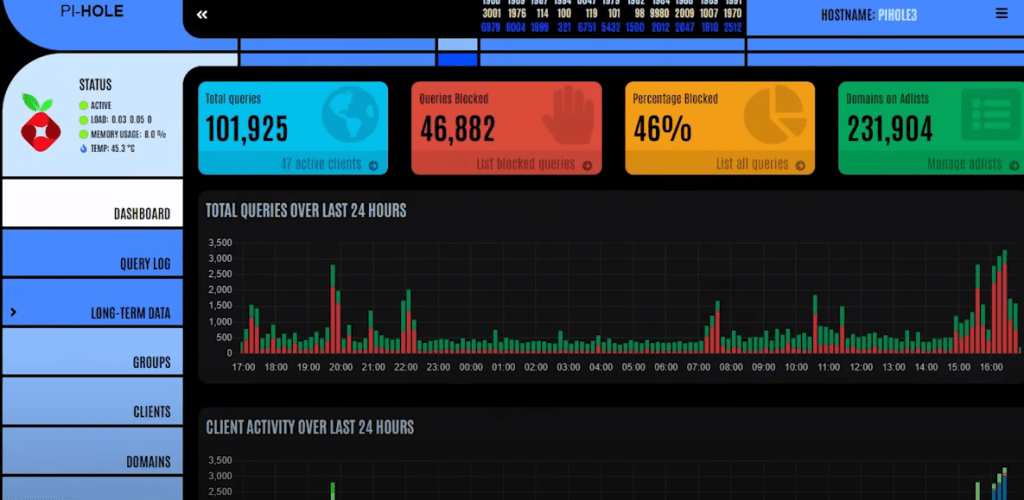
Here we can see on my main Pi-hole dashboard that the Pi-hole is blocking over 30% of all of the queries going out to the internet. And if you pair Pi-hole with some upstream DNS servers that filter out malware and adult content such as Cisco’s Family Shield DNS, you’ve got a pretty comprehensive solution for safe surfing in your household.
PI VPN
Another easy yet super powerful Raspberry Pi project is PiVPN. With PiVPN, you can build your own OpenVPN or wire guard server that allows you to securely connect into your home network remotely.
You can access your local servers and files and even use your home internet connection from a hotel room in Mumbai. The folks that maintain the PiVPN project have done an amazing job at keeping it up to date and making sure that the setup is as easy as possible even though VPN can be quite a complicated technology.
Once the server is set up, it even generates QR codes for your clients so that you can easily connect them to the VPN. I use PiVPN myself in my home network and oftentimes I forget that I even have it running, but when I need to connect to it remotely, it’s always right there and available for me to use.
Octoprint
If you have a 3D printer, OctoPrint is a must-have add-on. I use OctoPrint every single time I 3D print something. At its most basic, it allows you to monitor the status of ongoing prints as well as send projects directly to your 3D printer over the network instead of having to transfer them over with an SD card.
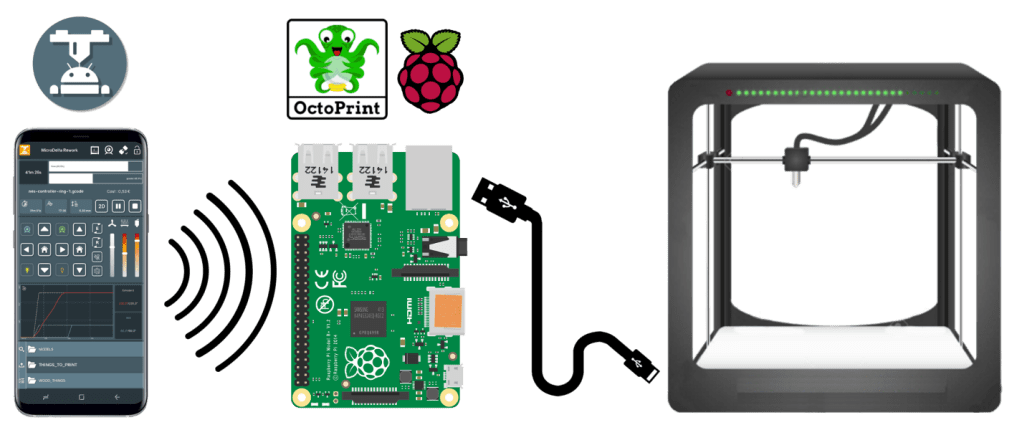
Once you start digging into OctoPrint plugins, however, you’re going to open up a whole new world of 3D printing possibilities. There are plugins for everything from simple toolbars and status monitors that keep an eye on your print temperatures, all the way up to full touchscreen displays for controlling OctoPrint, and even tools such as Octolapse for creating those amazing 3D print time-lapse videos that all the kids on TikTok seem to like so much.
OctoPrint takes almost no time to install, but it’s definitely a project that can send you down some pretty deep rabbit holes once you begin to explore the plugins. Now, I haven’t done any tutorials on OctoPrint myself, but the installation couldn’t be easier. OctoPie is a Raspberry Pi image for OctoPrint that can be flashed onto a micro-SD card directly from the official Raspberry Pi imager.
Home Assistant
Speaking of rabbit holes, the winner for the biggest potential rabbit hole has to go to my next favorite Raspberry Pi project, and that is Home Assistant. If you’ve never heard of Home Assistant, it has the power to change your life, quite literally.
Home Assistant is an open-source home automation server that can fully automate your home. It automatically detects and works with all of those little IoT devices that are filling up our homes and networks. Smart switches, light bulbs, thermostats, robot vacuums, video surveillance systems. I mean, you name it, if it can connect to your network, chances are it can be controlled and automated by Home Assistant.
Now, I’ve automated a ton of stuff around my house, and I’ve barely scratched the surface of what Home Assistant can do for you. My entire home lighting system is on Home Assistant, and it’s all tied into a single button on my stream deck. I’ve got lights and an air pump automated on my fish tank. My 3D printer power strip is a smart switch so I can turn the whole 3D printing setup on and off remotely. The next step for my own Home Assistant is to create some custom dashboards for different areas of my house, and then display those dashboards on cheap tablets.
Internet Speed Test Monitor
Now, this project brings together everything that you need to run a speed test on a set schedule and then graph the speed test results over time in Grafana. This is absolutely one of the most useful projects that I’ve done so far, and it can be expanded upon a lot if you want to do more than just internet speed testing.
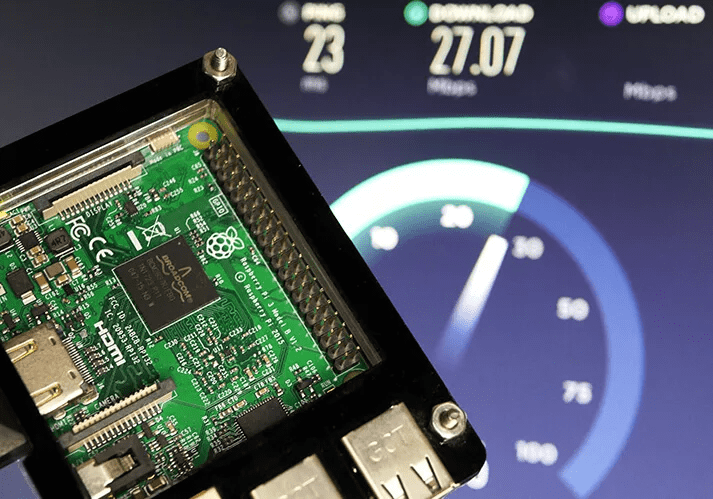
So here you can see the dashboard of Grafana that shows my speed test results. Now, while I’m only using this for monitoring a single internet connection today, this is just a full Grafana install, and it can be used for monitoring servers or anything else that has a data set Grafana can read.
In the case of this particular appliance, I first started by installing the base Raspberry Pi OS and then the Ookla speed test CLI. Then I installed InfluxDB, which is a simple time series-based database and set up the Ookla speed test results to write out to that database with a timestamp. Once all of that was done, it was simply a matter of installing Grafana and then using the InfluxDB database as a source for this graph. And then Bob’s your uncle, right? You’ve now got an internet speed test appliance, and you can place that appliance in any network, and it’s going to start measuring the internet and graphing the results over time.


Leave a comment